


A mini lightbar can only do its job properly when it is securely mounted and positioned appropriately for the vehicle.
For Australian work vehicles, that can be more complicated than it initially appears. A council ute, traffic management vehicle, service van and construction vehicle may all use compact warning lighting, but the way those vehicles are configured and operated can be very different.
Roof racks, ladders, canopies, antennas, signage and other vehicle equipment can all influence where a mini lightbar can be positioned. The vehicle may also spend its working life travelling between sealed roads, construction sites, depots and roadside work areas.
That is why choosing a Mini Lightbar Mounting Bracket Australia should not begin with the bracket alone.
A better starting point is to ask:
- Which mini lightbar is being installed?
- What type of vehicle is it being fitted to?
- Where can the light be positioned appropriately?
- What equipment surrounds the proposed mounting area?
- What conditions will the vehicle operate in?
The answers help determine whether the mounting arrangement is compatible, practical and appropriate for the vehicle’s intended use.
Australian Warning Systems supplies mounting equipment for selected mini lightbars as part of its wider range of vehicle warning and safety solutions. This guide explains what fleet managers, installers, councils, contractors and commercial vehicle operators should consider before choosing or installing a mini lightbar mounting system.
Start With the Vehicle’s Job, Not Just the Hardware
Two vehicles can use the same warning light while needing very different installation approaches.
Consider a council maintenance ute that primarily operates on suburban streets. Now compare it with a civil contractor’s vehicle that regularly travels over unsealed worksites.
Both vehicles may require warning visibility, but the conditions surrounding the installation can differ significantly.
Before selecting a vehicle mini lightbar mount, document the vehicle’s normal operating configuration, including:
- vehicle type and body configuration
- exact mini lightbar model
- proposed mounting area
- roof racks or ladder racks
- canopy or tray configuration
- antennas and communications equipment
- other warning lights
- typical loads carried by the vehicle
- expected road and worksite conditions
- electrical and wiring requirements
- future inspection and maintenance access
This provides a much better foundation for choosing mounting hardware than starting with a generic bracket and attempting to adapt it later.
What Mounting Plate Do I Need for a Mini Lightbar?
The first compatibility check should be between the lightbar and mounting plate.
There is no single mounting plate that should be assumed to fit every mini lightbar.
Different lights can have different dimensions, mounting points, base designs and fixing arrangements. Even two mini lightbars that look similar may require different mounting hardware.
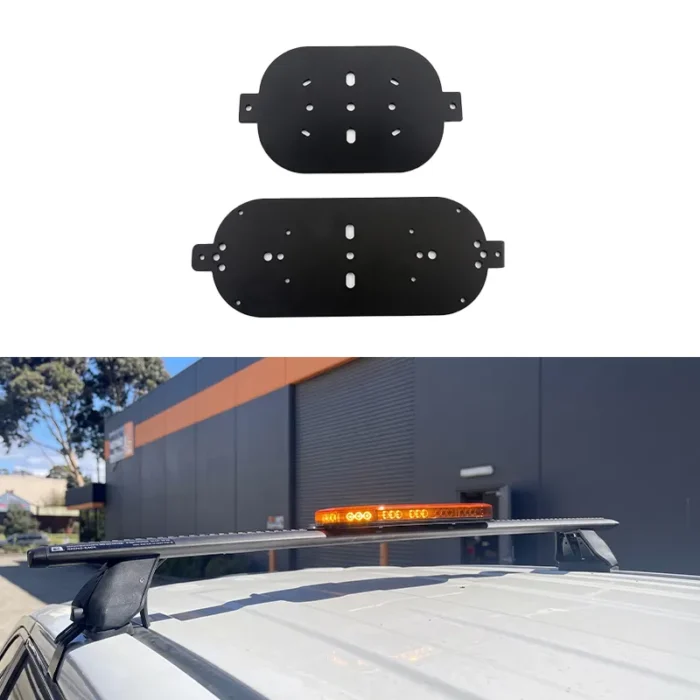
Australian Warning Systems currently lists minibar mounting plates in two sizes. The small plate measures 295 mm × 170 mm × 3 mm and is listed for the 500-LB246 and 500-BF700. The larger version measures 460 mm × 174 mm × 3 mm and is listed for the 500-LB380 and 500-BF800. Both are described in the supplied draft as using heavy-duty powder-coated steel with a two-tab mounting arrangement.
This demonstrates why an LED mini lightbar mounting bracket should be selected using documented compatibility rather than appearance alone.
A practical sequence is:
Identify the mini lightbar → confirm its mounting requirements → identify compatible mounting hardware → assess the vehicle installation.
That order helps avoid modifying or adapting hardware simply because the original plate was not properly matched to the lightbar.
Why Mounting Position Matters
Once the lightbar and mounting hardware are compatible, the next question is where the complete assembly should sit on the vehicle.
A mechanically secure location is not automatically the most appropriate warning-light location.
For example, a mini lightbar could be securely mounted but partially obstructed during normal operation by:
- ladders
- roof racks
- antennas
- equipment carriers
- roof-mounted signage
- cargo
- work equipment
- other warning systems
A roof mount for mini lightbar applications should therefore be assessed with the vehicle configured as it normally works.
If the vehicle regularly carries ladders, look at the warning light with the ladders fitted.
If it has a canopy or roof rack, assess how those structures interact with the light.
If other warning equipment is already installed, consider the complete vehicle layout rather than evaluating each light independently.
The objective is not simply to find enough space to install the equipment. It is to create a practical warning-light arrangement suited to the vehicle’s actual working environment.
What’s the Best Mount for a Mini Warning Light?
There is no single “best” mounting arrangement for every vehicle.
The appropriate mini warning light mounting bracket depends heavily on application.
For a council vehicle, repeatability across similar fleet vehicles may be important. A construction fleet may place greater emphasis on a mounting arrangement appropriate for regular worksite exposure and vibration.
A utility vehicle may need to work around ladder racks, antennas and other equipment, while a traffic management vehicle may already carry several forms of warning equipment.
Instead of looking for a universal “best” mount, assess:
Vehicle configuration
Where can the equipment be positioned without interfering with the vehicle’s normal operation?
Operating environment
Will the vehicle mainly use sealed roads, worksites, regional roads or a combination?
Surrounding equipment
Will normal loads or accessories obstruct the warning light?
Installation requirements
Can the mounting hardware and electrical system be installed appropriately in the proposed location?
Maintenance access
Can the warning light and mounting hardware be inspected or serviced without unnecessarily dismantling unrelated equipment?
For fleet applications, this type of assessment is more useful than choosing a bracket simply because it is labelled heavy duty or universal.
Are Mini Lightbar Mounts Universal?
Universal fitment should not be assumed.
Mini lightbars can differ in:
- overall dimensions
- base construction
- fixing positions
- cable entry
- weight
- mounting method
Vehicles vary just as much.
The roof configuration of one ute may be completely different from another commercial vehicle, even if both perform similar work.
The AWS mounting plates described in the existing blog draft list specific compatible LB and BF Series models rather than presenting the mounting plate as suitable for every mini lightbar.
That is a useful way to approach compatibility.
If a mounting product is described as universal, check what “universal” means for that particular product rather than assuming it means every vehicle and every lightbar.
What Makes a Mount Suitable for Commercial Vehicle Use?
Commercial vehicles may operate every working day and encounter conditions that private vehicles rarely experience.
Depending on the fleet, the mounting arrangement may be exposed to:
- regular road vibration
- construction or civil worksites
- dust and dirt
- changing Australian weather
- frequent vehicle operation
- equipment loading and unloading
- routine fleet inspections
Construction is therefore relevant.
The AWS mounting plates referenced in the original article use 3 mm heavy-duty powder-coated steel.
However, material strength should not be considered in isolation.
A heavy-duty mini lightbar mount still needs to be compatible with the lightbar and appropriate for the intended vehicle installation.
For fleet operators, another important factor is consistency.
Where several vehicles use the same compatible lightbar and mounting configuration, standardising the installation may make future inspections, servicing and replacement easier.
Mixed fleets, however, may require different solutions.
Where Are Mini Lightbar Mounting Systems Commonly Used?
Compact warning lighting can be relevant wherever a work vehicle needs additional visual warning without necessarily requiring a full-width lightbar.
Council and Municipal Vehicles
Council fleets can include road maintenance, parks, infrastructure and service vehicles.
These fleets often contain multiple similar vehicles, making consistent warning-equipment installation useful where the vehicles and products are compatible.
Utility and Service Vehicles
Electrical, telecommunications, water and infrastructure crews may operate beside roads or within active worksites.
Their vehicles can also carry ladders, racks, canopies and communications equipment, making mounting-position planning particularly important.
Traffic Management Vehicles
A mini lightbar may form one part of a broader warning configuration that includes directional warning lights, signage or traffic-management equipment.
The complete vehicle layout should therefore be considered.
Construction and Civil Fleets
Construction vehicles can move between public roads and demanding worksite environments.
Mounting hardware should be selected and installed with the vehicle’s actual operating conditions in mind.
Emergency and Roadside Support
Depending on the vehicle’s role and applicable requirements, compact warning lighting may form part of a wider visual and audible warning system.
In every case, the commercial vehicle mini lightbar mount is one component within the overall vehicle safety setup.
What Should You Check Before Modifying a Work Vehicle?
This is one area that is easy to overlook when researching warning-light mounting online.
Before drilling, modifying a roof structure or permanently routing wiring, consider the vehicle itself.
The exact requirements will depend on the vehicle and installation, but practical questions include:
- Does the installation require permanent drilling or modification?
- What is behind the proposed mounting surface?
- Will interior trim or roof lining be affected?
- How will wiring enter and travel through the vehicle?
- How will exposed entry points be appropriately protected?
- Does the installation interfere with other vehicle equipment?
- Are there manufacturer, body-builder, fleet or warranty requirements that need to be considered?
- Can the mounting hardware be accessed later for inspection?
- Is specialist installation appropriate?
This article should not replace the installation instructions for the lightbar, mounting hardware or vehicle.
Where structural modification or permanent electrical work is involved, the specific product documentation and appropriate professional advice should take priority over generic online installation instructions.
Does Mounting Position Affect Mini Lightbar Visibility?
Yes. Position can influence how readily the warning light can be seen from the directions relevant to the vehicle’s work.
This does not mean there is one universally correct position.
Instead, evaluate the installation in the context of the complete vehicle.
A useful practical check is to look at the vehicle from different directions while it is configured for a normal working day.
Ask:
- Is the light obstructed by racks or ladders?
- Does cargo change visibility?
- Does other equipment sit directly beside the warning light?
- Has additional equipment been added since the original installation?
- Does the location still suit the vehicle’s current role?
This is particularly important for fleet vehicles because vehicle configurations can change over time.
A light that was appropriately positioned when the vehicle was first fitted out may later be affected by new equipment.
A Practical Mini Lightbar Mounting Checklist
Before finalising an installation, confirm:
- exact mini lightbar model
- manufacturer-stated mounting requirements
- compatible mounting plate or bracket
- available vehicle mounting area
- surrounding roof and vehicle equipment
- normal vehicle loads
- proposed wiring route
- installation access
- expected operating conditions
- inspection and maintenance requirements
- interaction with other warning equipment
For the specific AWS mounting plates discussed earlier, the original article identifies a small 295 mm plate and large 460 mm plate for particular compatible mini lightbars.
The important point is not simply choosing small or large.
It is confirming which plate is actually specified for the lightbar being installed.
Mounting Equipment as Part of a Wider Vehicle Safety System
A mini lightbar mounting bracket has a specific role: it supports compatible warning equipment in an appropriate position.
The broader vehicle safety system can be much larger.
Depending on the vehicle and application, it may incorporate beacons, mini lightbars, directional warning lighting, audible warning systems, traffic signage, message displays and other safety technologies.
Connected digital alerting is also becoming another layer of road-safety communication. Rather than replacing physical warning lights, connected systems can complement visual and audible warning equipment by extending hazard awareness through supported digital platforms.
For fleet operators, this creates a more useful planning question:
What does this vehicle need to communicate to other road users and workers, and which combination of safety systems supports that requirement?
The mounting bracket then becomes one properly specified component within the overall solution.
Choosing a Mounting Solution That Fits the Vehicle’s Role
A good mounting decision begins with the risk and application rather than the product catalogue.
Understand where the vehicle operates.
Consider who needs to see the warning signal.
Look at the equipment already installed.
Confirm the mini lightbar and mounting hardware compatibility.
Then assess how the complete installation fits into the vehicle’s normal working environment.
This approach is particularly useful for councils, utilities, construction companies, traffic-management operators and commercial fleets because those organisations may operate several vehicle types with different warning requirements.
Australian Warning Systems’ role in this process extends beyond supplying individual mounting components. The wider objective is to bring together appropriate warning, mounting and vehicle-safety solutions for the application.
Where specific product compatibility is required, the Australian Warning Systems Mini Lightbar Mounting Plates page can be used to confirm the available mounting options.
Final Thoughts
A mounting bracket is a relatively small part of a vehicle warning system, but choosing it correctly requires more than matching a light to a piece of hardware.
Start with the exact mini lightbar.
Confirm its mounting requirements.
Then assess the vehicle, proposed position, operating environment, wiring requirements and surrounding equipment.
For Australian work vehicles, the most useful question is not simply:
“Which mini lightbar bracket should I buy?”
It is:
“Which mounting arrangement is compatible with the warning light and appropriate for the way this vehicle actually works?”
That shift makes the decision less about purchasing hardware and more about creating a properly considered vehicle warning system.
Frequently Asked Questions
Can a mini lightbar be mounted on a roof rack?
It may be possible, but suitability depends on the mini lightbar, mounting system, roof rack and vehicle configuration. The rack should not automatically be treated as a suitable mounting structure simply because space is available. The intended attachment method, normal roof loads, wiring and warning-light visibility should all be assessed.
Can I mount a mini lightbar without drilling?
Some lightbar and vehicle configurations may allow mounting methods that do not require drilling directly into the vehicle roof. However, this depends on the specific equipment. Check the manufacturer’s mounting requirements rather than modifying or adapting a mounting system solely to avoid drilling.
Does mounting position affect mini lightbar visibility?
Yes. Roof racks, ladders, signage, antennas, cargo and other equipment can potentially obstruct a warning light. Assess the finished installation with the vehicle configured as it normally operates rather than checking visibility only when the vehicle is empty.
Which mounting option suits a council or utility vehicle?
There is no single mounting arrangement for all council or utility vehicles. The decision should account for the vehicle body, lightbar model, surrounding equipment, normal loads, operating environment and required warning visibility. Similar fleet vehicles may benefit from a standardised installation where compatibility allows.
Can the same mini lightbar mounting plate be used across a fleet?
Potentially, where the vehicles, mini lightbars and mounting arrangements are compatible. Standardisation can make installation, maintenance and replacement easier, but it should not be forced across vehicles with different roof, canopy or body configurations.
Should mini lightbar mounting hardware be inspected?
Yes. Mounting equipment should be incorporated into the relevant vehicle or fleet inspection and maintenance process. Checks may include loose or damaged hardware, movement, visible deterioration, cable condition and changes to surrounding equipment that could affect the installation.
What should I check before mounting a warning light on a work ute?
Confirm the warning-light model and mounting requirements first. Then assess the roof, canopy, headboard or other proposed mounting location, surrounding racks and equipment, wiring route, normal vehicle loads and future service access. Permanent structural or electrical modifications may warrant professional installation.